Oct 04, 2022
Oct 04, 2022
We're Hiring
Join us and build the next generation AI stack - including silicon, hardware and software - the worldwide standard for AI compute
Join our teamGraphcore’s Poplar software stack now includes TensorFlow Serving for IPU, enabling easy, high-performance and low-latency serving of machine learning models. This page will show how simple it can be to create, train, export and serve a model within minutes using TensorFlow Serving.
Creating a machine learning application that solves a real-world problem is a multi-step process. We usually start by preparing and pre-processing data, then experimenting, developing, training, and validating the model. Finally, when the model is ready for the production environment, it is time to deploy or serve the model.
TensorFlow Serving is a high-performance system for serving machine learning models. It allows you to serve multiple models or multiple versions of the same model and send inference requests using both gRPC and REST APIs—all with minimal latency overhead.
TensorFlow Serving for IPU is included in the release of Poplar SDK 3.0 (having previously been in preview). Full compatibility means you can deploy models regardless of the TensorFlow version you are using. We have also released a serving API for exporting TensorFlow models into the IPU-optimized SavedModel format for later deployment.
We will now provide a simple end-to-end walkthrough for TensorFlow Serving, starting with environment setup and proceeding through the steps necessary for creating and deploying a model.
First, you need to download and install the SDK by following the simple instructions in the Getting Started section in our documentation.
To send gRPC requests you need to install the TensorFlow Serving API package which we do not distribute, so you need to use pip and install it from the official distribution. It is crucial to pass the --no-deps argument to pip so it does not reinstall the TensorFlow package. Note that the major and minor version of TensorFlow Serving API should match the version of TensorFlow you use. You can check the TensorFlow version with:
$ python -m pip show tensorflow
For example, if you use TensorFlow version 2.6.3, the package can be installed by running:
$ python -m pip install --no-deps tensorflow-serving-api==2.6.*
To run the examples below, you also need the Pillow package. It can be installed with: $ python -m pip install Pillow
Now you are ready to create and deploy your models for serving on IPU.
We can now easily create and export a model into the IPU-optimised SavedModel format using the newly released serving API. For that purpose, we create and train a very simple Keras model for handwritten digit recognition. The API also supports non-Keras models; more details with examples are available in the TensorFlow Serving documentation.
We start by creating and training the model. Once the model is trained, we can export it to the SavedModel format. The code below shows how to easily achieve this. The export_for_ipu_serving method called in the last line exports the model, changes the batch size value used for inference in TensorFlow Serving, and gives a name to the model’s outputs so you can easily reference the correct output later.
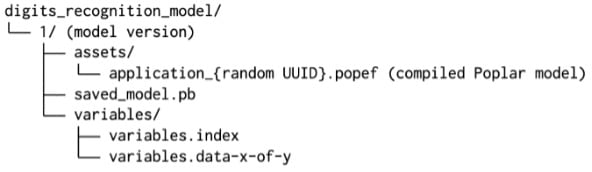
Note: TensorFlow Serving supports model versioning; versions are indicated by the name of the model’s directory. In this case we export the model to the directory called 1 inside a digits_recognition_model directory, so it is going to be recognized as the first version of the digit recognition model.
The export method performs several steps including compiling a model into an executable and storing it in the Poplar Exchange Format (PopEF) format, creating a small TensorFlow graph that uses the IPU embedded application runtime and saving it in the standard SavedModel format. The PopEF file is stored inside the assets subdirectory. The resulting SavedModel's directory structure will resemble the following example:
 For more details on the export procedure, we recommend reading the TensorFlow documentation for exporting models as well as the documentation for the serving API itself.
Once the model is exported, you can use the SavedModel CLI tool to analyse the structure of the SavedModel:
$ saved_model_cli show --all --dir digits_recognition_model/1
Doing this allows you to check the signature name of the exported SavedModel, datatypes, shapes, and names visible to TensorFlow Serving and the signature of the exported functions with their names and arguments.
The result will resemble the example below:
The TensorFlow Serving application comes as part of the Poplar SDK. It can expose both gRPC and REST inference endpoints, but for maximum performance we recommend using the gRPC API for sending inference requests.
The application can be launched on the server by calling:
$ tensorflow_model_server-r2-<version> --port=8500 --model_name=digits_recognition_model --model_base_path=/absolute/path/digits_recognition_model
That way the application exposes gRPC API on port 8500 and serves previously exported model called digits_recogntion_model.
Now that the application has been launched, you are ready to send the inference requests to the server. We use the sample image of handwritten digit 7 to test the model’s answer. We save the below image as handwritten_7.png.

The code below shows how to create and send an inference request to TensorFlow Serving using gRPC API. Note that for optimal performance we recommend always using the Graphcore distribution of TensorFlow both on the client and server side.
When executed, this script prints the message Predicted category: 7.
This post has provided a brief introduction to TensorFlow Serving for IPU, which delivers a high-performance and low-latency system for serving inference solutions. The system is easy to use and can be configured in just a few minutes.
Documentation pages for the Graphcore distribution of TensorFlow Serving 2 and TensorFlow Serving 1 are available on the Graphcore documentation portal. We have also published examples for TensorFlow 2 and TensorFlow 1 to help you get started.
TensorFlow Serving is just one example of how Graphcore is constantly creating, implementing, and improving new features to provide an experience that empowers AI users with all the benefits of our hardware and software while minimising the barriers to entry.
We want users of Graphcore technology to be able to quickly and easily develop models natively on the IPU; to port existing models to the IPU with minimal code changes; to integrate models seamlessly with their chosen platforms, ML frameworks, and tools; and to try out IPU-based models off the shelf with minimal setup, time investment, or code knowledge required.
Share: